

8 Cool Braids You Can Actually Do on Yourself
Braids: They’re so pretty to wear, but also so hard to do. Amirite? Even the ones that are supposed to be “easy” on Pinterest seem to require some sort of hair sorcery or superhuman hand strength. All too often we’re left either with a tangled mess or end up settling for a sad ponytail. Sarah Potempa is here to help fix that.
If you’re not already familiar with Potempa, she’s a celebrity hairstylist and the founder of a handy little tool you may have heard of called the Beachwaver. And she happens to be one of the best braid experts out there. Really! She once completed a 365 Days of Braids challenge where she wore a different braid every single day for an entire year. If that’s not proof of her talent and dedication, we don’t know what is.
So on that note, we asked Potempa to come to the Glamour offices and teach us her favorite techniques based on our hair length and textures, all at varying levels of difficulty—”1″ being something you probably mastered at summer camp in grade school to “5” meaning you’ve got your braid game on lock. Here, her best advice on how to braid your hair—along with cute hair DIYs for short hair, fine hair, curly hair, and more.
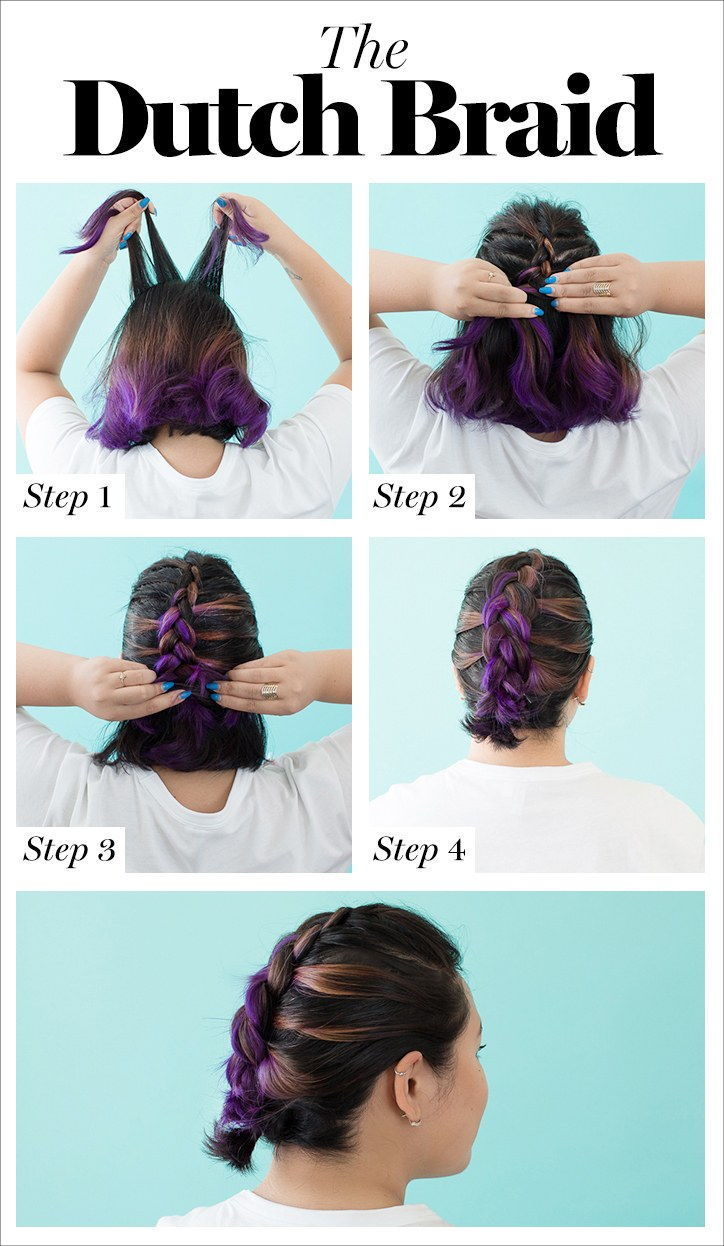
The Dutch Braid

Level of difficulty: 2, but on short hair? 4
Time to complete: 5 minutes
The How-To
Step 1: Separate your hair into three even sections.
Step 2: Create a Dutch braid by braiding the sections in a “left under, right under” pattern, weaving the left piece of hair under the center piece, then right piece under the center, grabbing and adding small sections of hair each time as you go. (Think of it like an inverse French braid.)
Step 3: Add hair from your roots as you continue down the back of your head. Secure with an elastic.
Step 4: If any pieces from the bottom don’t fit into the braid, simply clip them up towards the middle to make it look cohesive.
Editor Tip: “As a woman with short hair, I never really thought wearing braids was an option for me. I do other stuff like dye my hair purple instead. Which, fun fact, this braid really brought the color out more than a traditional three strand or French braid style.” —Danielle
The Headband Braid
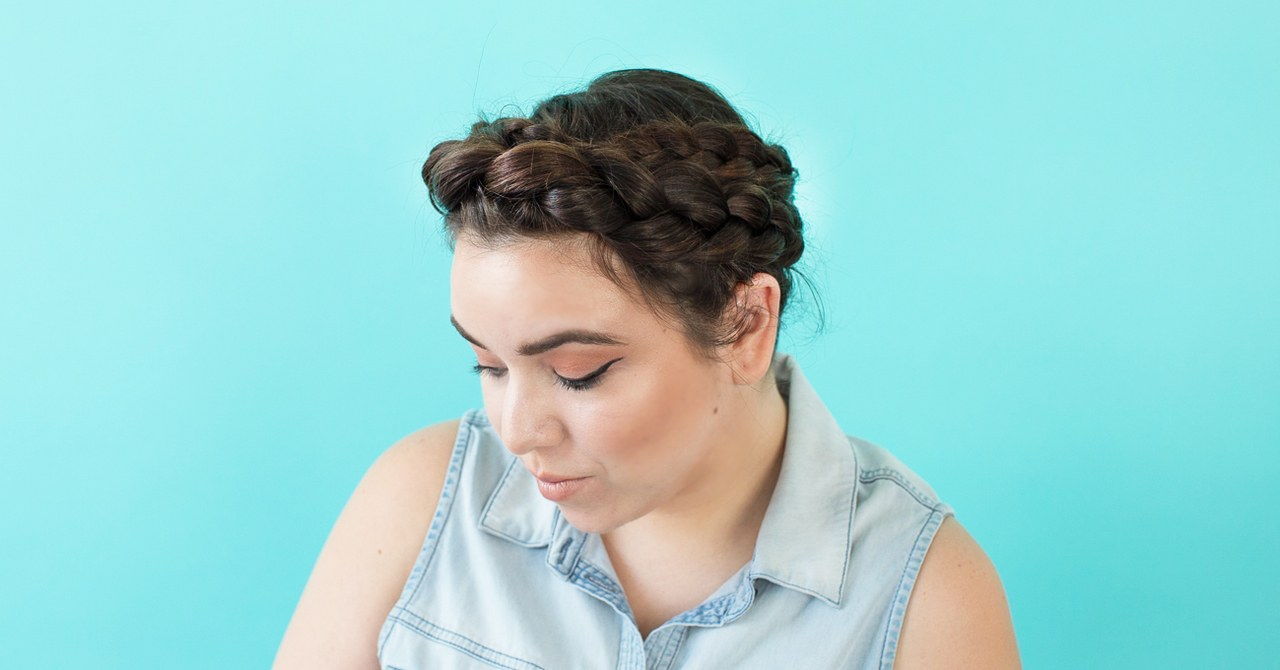
Level of difficulty: 3.5
Time to complete: 5 to 7 minutes

The How-To
Step 1: Separate your hair down the middle into two equal parts.
Step 2: Starting with the left side, take a handful of hair and separate it into three pieces.
Step 3: Following the dutch braid mantra “left under, right under,” adding small sections of hair as you go.
Step 4: Continue braiding around your hairline and secure it at the top of your head.
Step 5: On the right side, create a second dutch braid (following steps 2 through 4 above) and wrap it around your head on the opposite side, making sure the two meet.
Step 6: Wrap the end around the first braid and pin it in place.
Editor Tip: “Figuring out the sectioning and what to put where was definitely a struggle for me. But Sarah told me to keep repeating my ‘braid mantra,’ which is basically weaving directions, and that helped me find my groove. From there, it was all gravy.” —Julianne
The Ponytail Braid
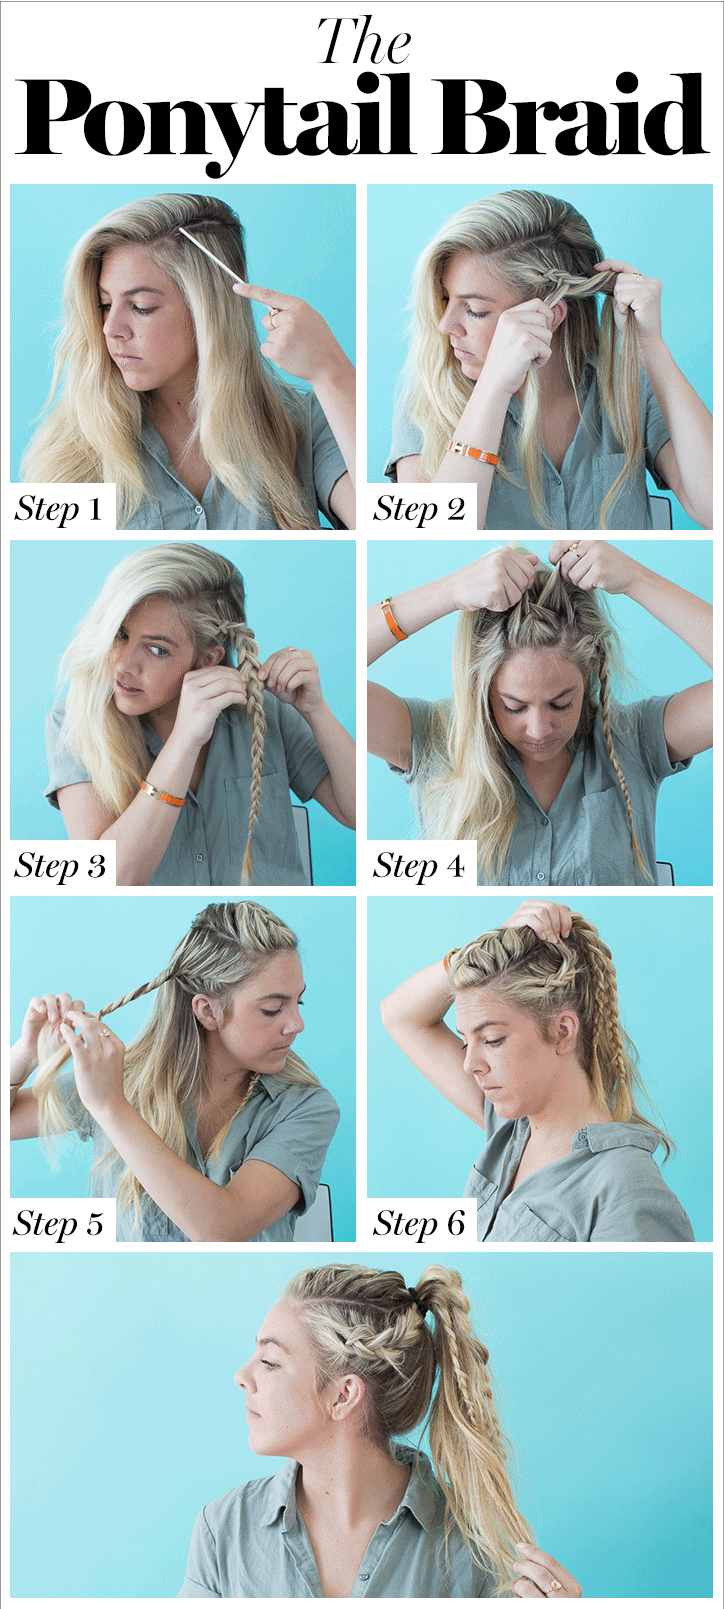
Level of difficulty: 4
Time to complete: 10 minutes
The How-To
Step 1: Do a deep side part.
Step 2: Taking the right section, separate your hair into three strands and create a dutch braid (remember “left under, right under”) along your ear.
Step 3: “Pancake” the braid, which means tug at small pieces of your braid so they loosen up and create more volume.
Step 4: Take a two-inch section at the middle of your head (this will be your “mohawk” part) and do a standard three-strand french braid (right over, left over, grabbing pieces as you go) down the middle, stopping at the curve of your head.
Step 5: Now, on the other side, create a two-strand twist and secure with a clear elastic.
Step 6: Pull all your hair up into a high ponytail and secure with an elastic.
Editor Tip: “This is such a badass take on your typical ponytail braid. Just be sure not to ‘pancake’ too much, unless you don’t care about your shorter pieces sticking out all over the place.” —Margo
The Crown Braid
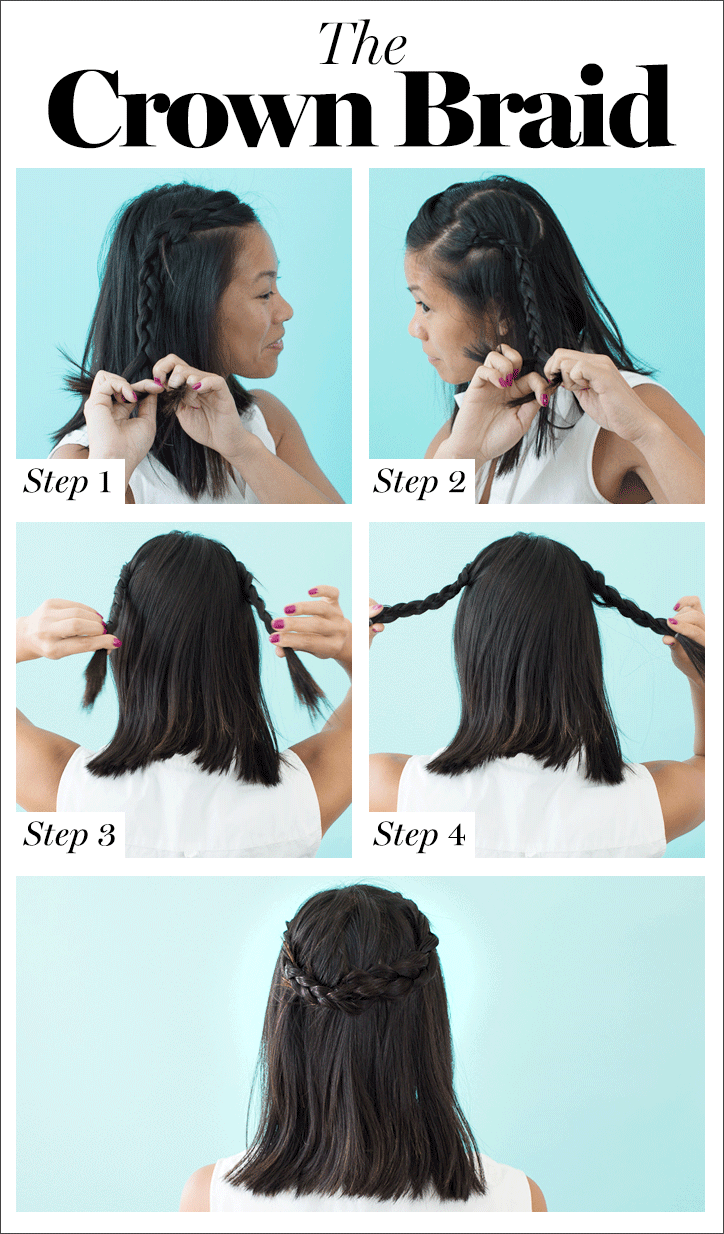
Level of difficulty: 1
Time to complete: 2 minutes

The How-To
Step 1: Part your hair in the center. Taking a one-inch strand from the right side, create a classic three-strand braid. Secure with an elastic.
Step 2: Do the same thing on the left side.
Step 3: Pull the two braids behind your head and criss-cross them.
Step 4: Pin the braids into place underneath one another.
Editor Tip: “While this braid was easy, it was pinning the two braids that took some work. Just be patient, and maybe recruit a friend to help if you’re having trouble.” —Jessica
The Half-Up Bun Braid
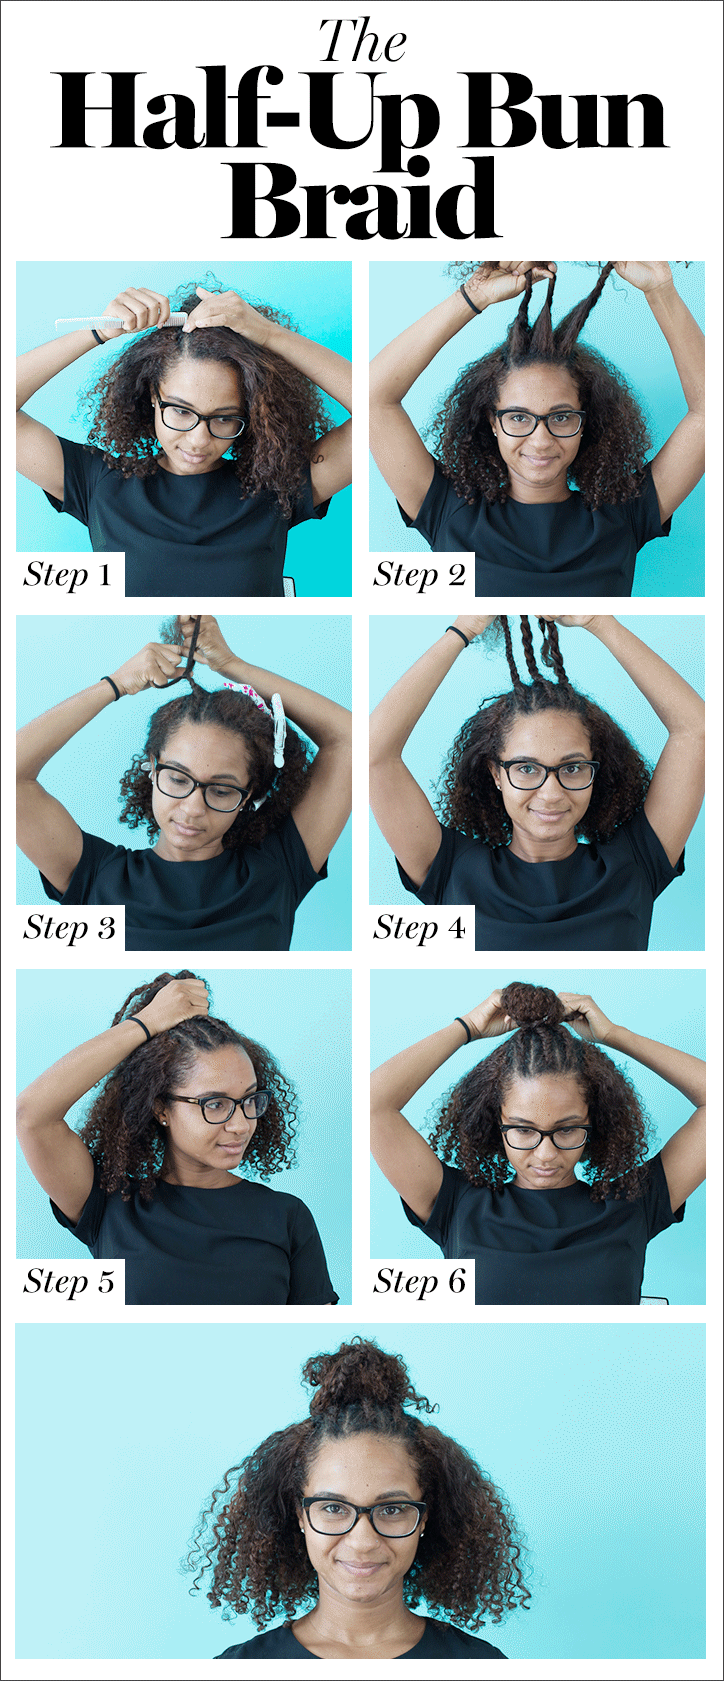
Level of difficulty: 4
Time to complete: 10 minutes
The How-To
Step 1: Part your hair into three small sections at the top of your head.
Step 2: Clip the right two sections down, and focus on the remaining left piece first.
Step 3: Create a small braid, angling it toward the back, but stopping at the curve of your head.
Step 4: Do the same thing with the remaining two sections.
Step 5: Pull the braids into a half-up ponytail and style it into a bun. Secure with an elastic.
Step 6: Take any pieces sticking out and wrap them around the bun, securing with pins.
Editor Tip: “It’s tough to braid my hair because my curls are so spirally. But going slow and pulling the braids taught helped. I love this as a way to spruce up a bun or ponytail.” —Concepcion
The Low Ponytail Braid
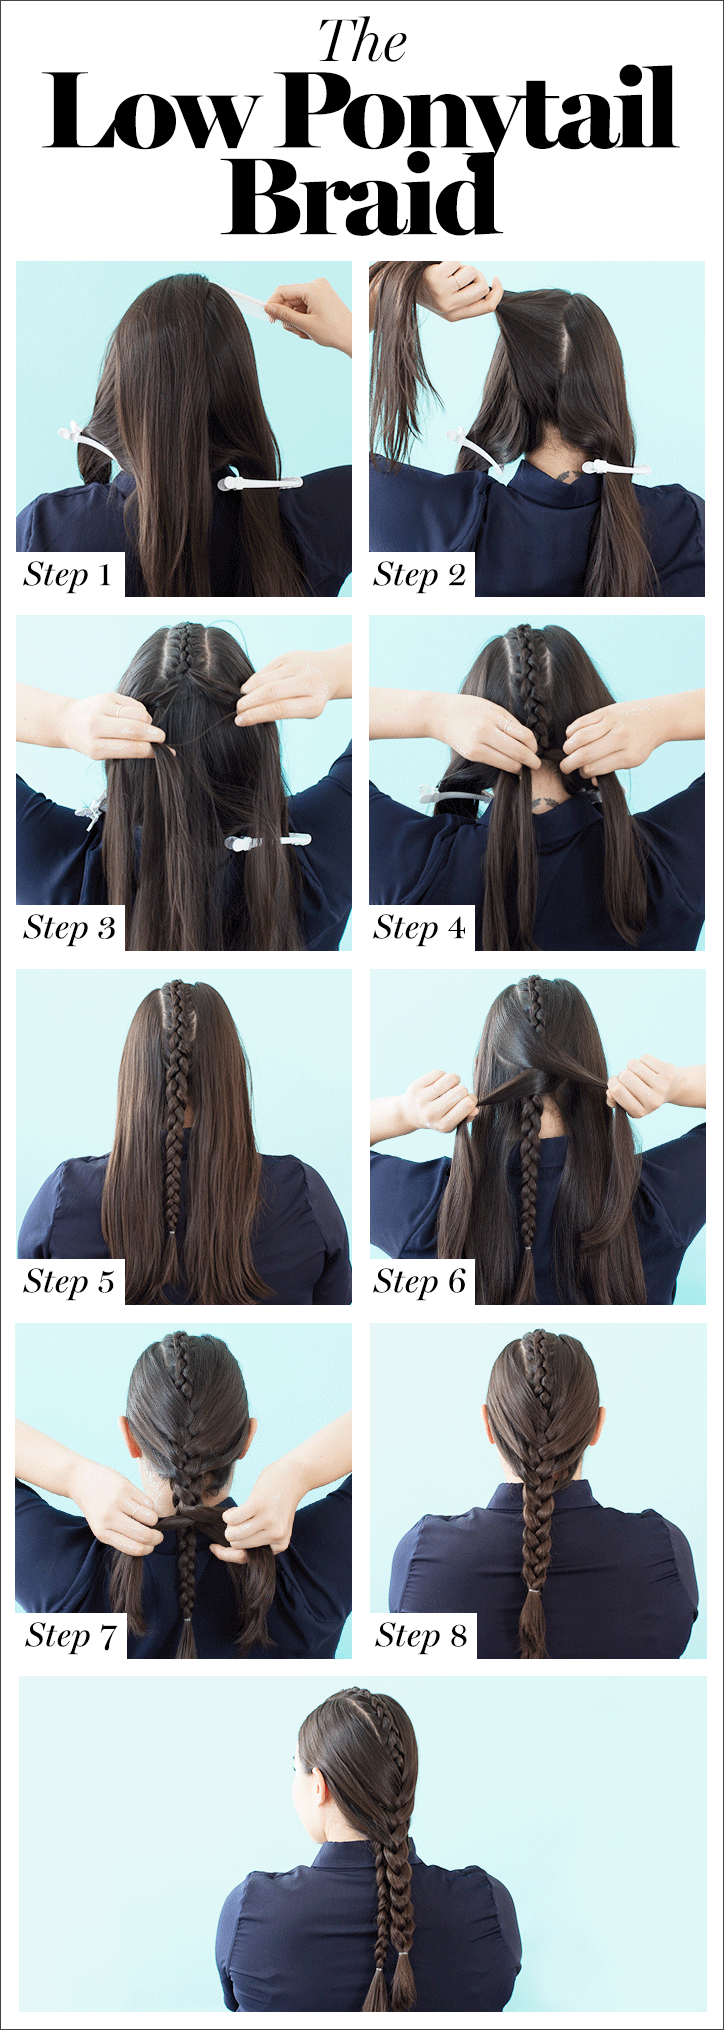
Level of difficulty: 5
Time to complete: 15 minutes

The How-To
Step 1: Part your hair into three sections.
Step 2: Taking the middle section (the “mohawk” section) first, start a dutch braid (refer to “The Dutch Braid” above).
Step 3: Continue braiding down the back of your head, making sure everything is tight.
Step 4: As you continue down the braid, add in extra pieces from the middle section to create a thicker plait.
Step 5: Secure with an elastic.
Step 6: Take the remaining hair from the left and the right and start a second French braid on top of the first one.
Step 7: Continue grabbing more pieces and finish the braid.
Step 8: Secure with an elastic.
Editor Tip: “French braiding the back of your head is hard! Try setting up a mirror that allows you to see the braid at all angles. I think this look is especially great for a night out when you’re not wearing much makeup—the wow-factor of the braid makes up for a clean face.” —Lauren
The Double Side Braid
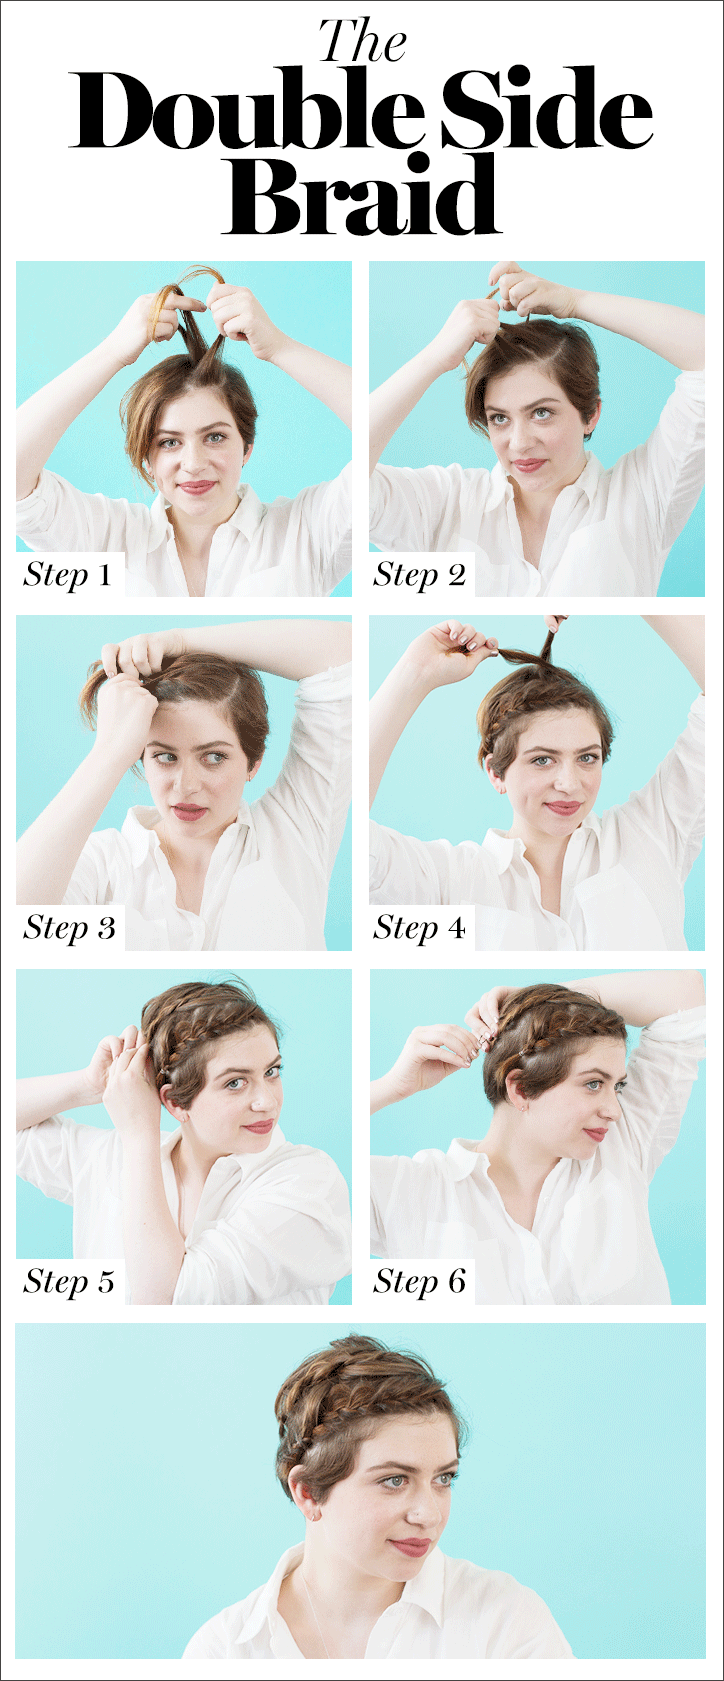
Level of difficulty: 2
Time to complete: 2 minutes
The How-To
Step 1: Take a one inch section at your hairline and separate into three smaller sections.
Step 2: Create a French braid: right over, left over, adding hair from the root as you braid along your hair line.
Step 3: Secure with an elastic.
Step 4: Next, add a second French braid about an inch behind the first.
Step 5: Secure with an elastic.
Step 6: Pin back any flyaways or shorter pieces that are sticking up.
Editor Tip: “This is no-joke actually easy. Try hiding the little nubs of hair that poke out when they’re too short by covering them up with some surrounding hair and pinning them down. It looks a lot more polished.” —Erin
The Under Braid

Level of difficulty: 4
Time to complete: 7 minutes
The How-To
Step 1: Flip your head upside-down. Take a large section and split it in two.
Step 2: Start braiding the left section up. Secure with an elastic. Do the same thing with the right section.
Step 3: Now, flip your head up, pulling all your hair into a high ponytail.
Step 4: Twist the ponytail into a bun and secure with a bobby pin. Done!
Editor Tip: “The hardest part about this was definitely the upside-down braiding part and not being able to see what you’re doing. Just go slow, and after that, it’s a breeze. It’s a great idea for working out!” —Kate
Looking for more braidspo? Check out our favorite celebrity examples and more here.